Friday 28 February 2014

Quick Tortellini Soup


This is the first recipe I've improvised in a long time, especially since I'm trying to get some use out of all the cooking magazines I keep buying. It's very quick, simple, and delicious, exactly what's needed for a weekday night.

Tortellini Soup (for 4):

4 c. chicken broth (if you want to go vegetarian, replacing with vegetable broth will do so)
1 large package of tortellini
1 tbsp olive oil
2 cloves garlic, diced
1/2 c. diced shallots or onions
1/2 c. diced tomatoes
4 generous handfuls of washed, chopped spinach
1/4 c. white wine
1 tsp. sea salt (or to taste)
generous pinch of pepper

For the croutons:

eight slices of day-old baguette
enough olive oil to brush over the tops of each slice
pinch of parmesan cheese per slice (about 1/4 c.)

1. Preheat oven to 300'C. While it does that, heat olive oil in large, heavy pot.

2. Add shallots to the oil, cook until beginning to turn translucent. Add garlic and cook a minute longer.

3. Deglaze pot with white wine; cook down for a minute.  Add broth and simmer for another minute. While it does so, prepare the croutons: place each slice of bread on a baking sheet. Brush the top of each with a bit of olive oil, then add a pinch of parmesan cheese. Place into the preheated oven.

4. Add tomatoes to the broth. Simmer another minute, then add the tortellini. Cook according to the time indicated on the packaging.

5. Taste the broth. Add the salt, adjusting to taste, then add the pepper. Take the soup off of the heat and add the spinach immediately and all at once, stirring in thoroughly.

6. Ladle soup into four bowls. Remove croutons from the oven (they should be crisp and lightly golden brown) and place two atop the soup in each bowl. If desired, garnish with a bit of extra parmesan.

Enjoy!

Note: this soup makes tasty leftovers, too!


Wednesday 26 February 2014

Review: February Tea Sparrow

Here she is!
So, my Tea Sparrow package arrived a few days ago. They're apparently all shipped out on the 17th every month, but it took about three days to reach me, two hours' drive away. Got to love the Canadian postal system!

Anyway, for my very first Tea Sparrow review, I'll go over the packaging. After this, unless I mention any changes, just assume it's the exact same.

The back of the box, with the cute logo.


There were two cards in the box: one (the green) with the introduction on the front, and Tea Sparrow Tea Tips on the back, and a coupon for $15 towards any purchase from pantybypost.com. I checked it out, and it's apparently a subscription service that "delivers premium panties for about $15 a month... right to your door." On the actual website, I did find underwear for men, but they were quite boring. Additionally, after I'd been on the site for 5 minutes, it all inexplicably turned to Russian. Same site, only... Russian. I hadn't done anything to request this change so I suppose it's something they do to keep things exciting, or maybe it's a glitch. Anyway, I decided that pantybypost is not for me at this time. Still, it's a nice thought, I suppose. Discounts and freebies are always appreciated.

From left to right: Organic White Rose by Numi; Lavender Earl Grey by Rishi; Strawberry Champagne by Tea Desire, and Organic Chai Rooibos by Gathering Place.
The tea packets were nicely and economically wrapped in brown tissue, and arrived in perfect condition. I didn't smell anything upon opening the box, but sniffing the tops of the envelopes, I caught some scent, particularly of the Strawberry Champagne, which smelled absolutely amazing. Of course, that was the tea I chose to try first.

Note: Both my partner and I tried all the teas except for the Lavender Earl Grey, as my partner, who normally has pretty good taste, for whatever reason does not like Earl Grey. Well, more for me. Anyway, we tried them over several days, so that each one was tried fairly. The results are our compiled notes (well, mainly mine; my partner mostly said, "Mmm, nice.")

Strawberry Champagne by Tea Desire:

Look at this. Gorgeous!
Ingredients: Sencha green tea, carrot pieces, pineapple pieces (pineapple, sugar), strawberries, cornflowers, sunflowers, natural flavour.

The scent of this tea is mouth-watering. It's an effervescent, sweet, floral strawberry. And the taste, fortunately, reflects that. 

From the scent, I thought it would be 'Summery' for me, but it's a slightly darker taste than that. There is definitely a champagne flavour that comes through more while drinking - a slightly boozy sweetness. It's not fizzy but it tastes like it could be. A very well done strawberry champagne. My partner in particular likes it. 

9/10.

This tea can be purchased at teadesire.com at $6 per 50g.


Organic White Rose by Numi Organic Tea:

Smells just like a memory.
Ingredients: Fair trade certified organic white tea and organic rose.

Both my partner and I had the same reaction to smelling this: a strange and happy reminiscent feeling. For me, I'm reminded of my grandparents' cabin by the lake, where big untamed rose bushes bloomed every summer, smelling exactly like this tea. For my partner, it's the memory of walking down the country trails in the forest by the house, and the scent of the wild roses that grew there. This smells of true rose, a light and green, nostalgic floral. It's not perfume-y, more like standing in a rose garden on a summer day. And no wonder, with the generous amount of rose petals in the mix. 

It tastes as it smells - delicately floral. It's not heavy at all, and tastes lovely with a bit of honey.

9/10.

This tea can be purchased at numitea.com at $29 for 4 oz. If you want to try it before committing, a 16 count box of the tea bag version is only $6.99.


Organic Chai Rooibos by Gathering Place:

Warning: complete tease.
Ingredients: Rooibos tea, ginger, cinnamon, fennel, cardamom, cloves and black pepper.

Oh, Organic Chai Rooibos, you tricked me good. When I opened your envelope, you smelled absolutely amazing: spicy, warm, fragrant in a wonderful warm way reminiscent of ornate brass tea pots and silks in gold and red. I suppose that's a lot to live up to. But where did all that promise go?

It tastes like chai, yes, but it was very... faint, especially considering the strong scent. Perhaps I shouldn't have added cream to my tea, but that's how I've always drunk chai, and I haven't found it to dull spices much in the past. In fact, a few years ago, my very favourite chai was another herbal version, which stood up admirably to my additions of cream and honey. After tasting this one the first time, I thought that maybe it needed more steeping. I must have left it for a good fifteen minutes all together. The package does say that it takes 10 minutes to steep. Maybe, if I'd used more than the generous tablespoon I did, and left it for twenty minutes, it would have lived up to its promise. But by then, my tea would be cold. Is this meant to be an iced tea? Possibly, but I'm not an iced tea drinker, and there was no indication of that on the package.

I think that in the future, I'll make it the old-fashioned way: simmered in milk on the stovetop for at least half an hour. I suspect that it will be excellent this way. However, used as directed, it was a bit of a let-down.

7/10 - but if it does turn out to be great the old-fashioned way, I'll be sure to edit this.

This tea can be purchased at gatheringplacetrading.com at $8.05 for 100 g.


Lavender Earl Grey by Rishi Tea

The lavender buds weren't very, well, lavender, but they sure packed a punch.
Ingredients: Organic Fair Trade Certified black tea, organic lavender flowers, natural essential oils of bergamot and lavender.

The interesting thing about lavender, for me, is that it always has had the faintest hint of citrus to it. It's not surprising, then, that the scents of the lavender and bergamot blended completely to my nose. In fact, it smelled mostly lavender. Not that I minded, it was very nice indeed.

During drinking, the bergamot came out slightly more, but the taste was still that of lavender with a trace of citrus. However, the overall impression was still somehow that of an Earl Grey, making me wonder if I noticed more of the bergamot subconsciously, or if lavender was simply very Earl Grey in nature anyway. I've had the Tazo Tea version of Earl Grey with lavender, but I must say that this one beats it by far. Yes, this tea was delightful. It's a fragrant, floral, elegant Earl Grey, but just a little bit fun. It makes one feel like the type of person who reads a rollicking adventurous travel tale while sipping their tea from a china cup in their garden on a quiet, warm summer afternoon. Or, in other words, it makes a very good cup of tea.

9/10.

This tea can be purchased at rishi-tea.com at $4 per oz, or $13 per the quarter-pound.


Overall, I'm very impressed, and have found several teas that might become staples in my tea cupboard. I hope next month goes as well!

Note: Obviously I loved a lot of these teas, so why only 9/10? Well, I'm reserving that for something that is well and truly the best thing ever - something I can't live without, something irreplaceable. However, 9/10 is still considered pretty damn good. Any of them might be that 10/10 for you - give them a try!

Tea Sparrow costs $20 a month, with free shipping to Canada and the continental US.

Sunday 23 February 2014

Mushroom and Thyme French Toast

Thyme for dinner.
This recipe is from a copy of the Fall 2013 Cuisine Tonight magazine. It's amazingly filling! I always end up with leftovers, which are just as delicious (maybe more?) reheated the next day.

For the toast:

- 4 slices challah (or any light, egg-based bread - I usually use German egg braid)
- 2 eggs
- 1/2 c. heavy cream
- 2 tsp. chopped fresh thyme
- salt and back pepper to taste
- 1 tbsp. unsalted butter

For the sauce:

- 8 oz. cremini mushrooms, sliced
- 3.5 oz. shiitake mushrooms, stemmed and sliced
- 2 tbsp. vegetable oil
- 1/2 c. sliced onion
- 2 tbsp. unsalted butter
- 2 1/2 tsp. tomato paste
- 2 1/2 tsp. all-purpose flour
- 1/4 c. dry sherry
- 3/4 c. low-sodium vegetable broth (or, if you aren't going for vegetarian, chicken broth works very nicely)
- 2 tbsp. cream cheese
- 1 tsp. chopped fresh thyme

1. Preheat broiler with rack 6 inches from element.

2. Broil the bread until golden on both sides, about 5 minutes. Let bread cool.

3. Whisk eggs, cream, and 2 tsp. thyme in a shallow dish; season with salt and pepper. Add bread; soak 10 minutes, turning often.
Pro tip: be more efficient at mealtimes by utilizing a thyme vortex!

4. Saute mushrooms in oil in a saute pan until browned, 6-7 minutes. Transfer mushrooms to a bowl. Saute onion in the same pan in 2 tbsp. butter, 1-2 minutes.

5. Stir in tomato paste and flour; cook 1 minute. Whisk in sherry until thickened. Stir in broth and mushrooms and cook about 2 minutes. Whisk in cream cheese and 1 tsp. thyme; keep warm.

6. Fry bread in 1 tbsp butter in skillet until browned on both sides, about 5 minutes. Serve French toast with mushroom sauce.
I like to fry the toast in the same pan I cooked the sauce in - more flavor, less washing up.
Enjoy!

Sunday 16 February 2014

Project #1: Seedlings: First Seedlings!

First of all, look at how my two garlics are growing!
I just realized that there's tinsel under that box? The cat must have put it there??? I don't understand, we had no tinsel this Christmas...
Anyway, on to the seedlings.

I must be honest. It had been well over two weeks, and I was despairing. At around 10 days, I checked the soil, wondering why nothing had deigned to sprout for me. To my surprise, it was dry under the first few milimeters. I'd been noticing that the little containers seemed to go dry very quickly, but I was misting them several times a day, so I thought it was fine. After discovering the dryness, of course, I decided to try another tactic and began watering from the bottom every few days, and pouring water directly on top every day. That seemed to work better.

But still there was no sign of anything sprouting, not even when I watered them yesterday (so, at day 16).

Then, this morning, I went to do the watering, and suddenly, there were sprouts. Three different containers had sprouted:

The thyme;

The Candy-Stripe Cosmos:

and the lavender:

This isn't a plant but it is cute:
She thinks I'm an idiot for freaking out over tiny green things.
How or why they all seemingly sprouted overnight, I'm not sure. I did have a weird dream right before I woke up this morning - something about pulling a big plant out of my seedling pots and seeing that the seeds had started sprouting. An interesting coincidence - I think maybe I noticed the sprouts subconsciously or something when I watered them yesterday? Well, whatever caused it, I'm pretty darn excited. Here's hoping they survive!


Spinach Salad with Honey Bacon Dressing

The Salad.
After the heavy dinner we had on Valentine's Day, I decided to make something a litter fresher and lighter the next evening. This is our favourite salad. I adapted the dressing from Alton Brown's Warm Bacon Dressing - I found his version a little to vinegary for me, so I cut the vinegar down a bit and replaced the sugar with a generous dollop of sweet, warming honey.

This recipe feeds two people pretty well all on it's own. With the addition of fresh bread with butter and a side like soup or sliced chicken breast, it could easily be extended to feed four.

The Salad:

- about four loose handfuls' worth of spinach, leaves washed and stems trimmed
- 6 strawberries, sliced (3 strawberries per portion)
- 2 hard-boiled eggs, peeled and sliced (one egg per portion)
- 6 strips of thick-cut bacon, diced

Nice additions: in the past I've added sliced chicken breast and avocado. Really, with salad, almost anything goes. I imagine toasted almonds would blend nicely with the honey in the dressing.

The Dressing:

- 3 tbsp of warm bacon grease
- 2 tbsp red wine vinegar
- 2-3 tbsp honey, warmed
- 1/2 tsp dijon mustard
- salt and pepper to taste
The smell of freshly-sliced strawberries is Summer to me.

1. Start frying the bacon. While it fries, slice strawberries and eggs in preparation for salad assembly. Warm
the honey in the microwave (15-20 seconds should do) just before bacon is finished.

2. Once bacon is done, remove with a slotted spoon and place in a paper-towel lined dish. Remove pan from heat and carefully measure out 3 tbsp of the grease. Be sure to scrape up and include as many cracklings as you can - that's where the majority of the flavour is.
Yummy yummy cracklings.

3. In a bowl, combine the bacon grease, vinegar, and mustard. Whisk thoroughly. Whisk in the honey, beginning with 2 tbsp, and adding more until it is to your taste. I usually end up with 3 tbsp, since I like a sweet vinaigrette. Add salt and pepper.
It should look like this. But if it doesn't, don't worry, I'm sure it's still delicious!

4. Assemble salad ingredients however you like, and drizzle the dressing over top. Enjoy!

And in case you weren't hungry yet...

Saturday 15 February 2014

Lobster

So, as I mentioned in 'What's The Plan?', I wanted to make lobster for Valentine's Day. And I did! Unfortunately, I neglected to take pictures.

Anyway, it was... okay? I followed the directions and boiled the frozen lobster tails for about 4 or 5 minutes. They really were very pretty afterwards. I served them along with twice-baked potatoes and teriyaki steak. And then, my partner announces that they have never had lobster before. And, it turns out that my partner does not, in fact, actually like lobster.

To be fair, though, it wasn't amazing lobster. Like I said, it was just okay. The middle had the sweet mild flesh I love, but most of it was a bit dry and tasteless - maybe I boiled it for too long? The melted garlic butter I served it with helped save it, but evidently it wasn't tasty enough to convert my partner to lobster (my partner does not, apparently, like crab either, so maybe that's just that).

However, the steak was a big hit!

Monday 10 February 2014

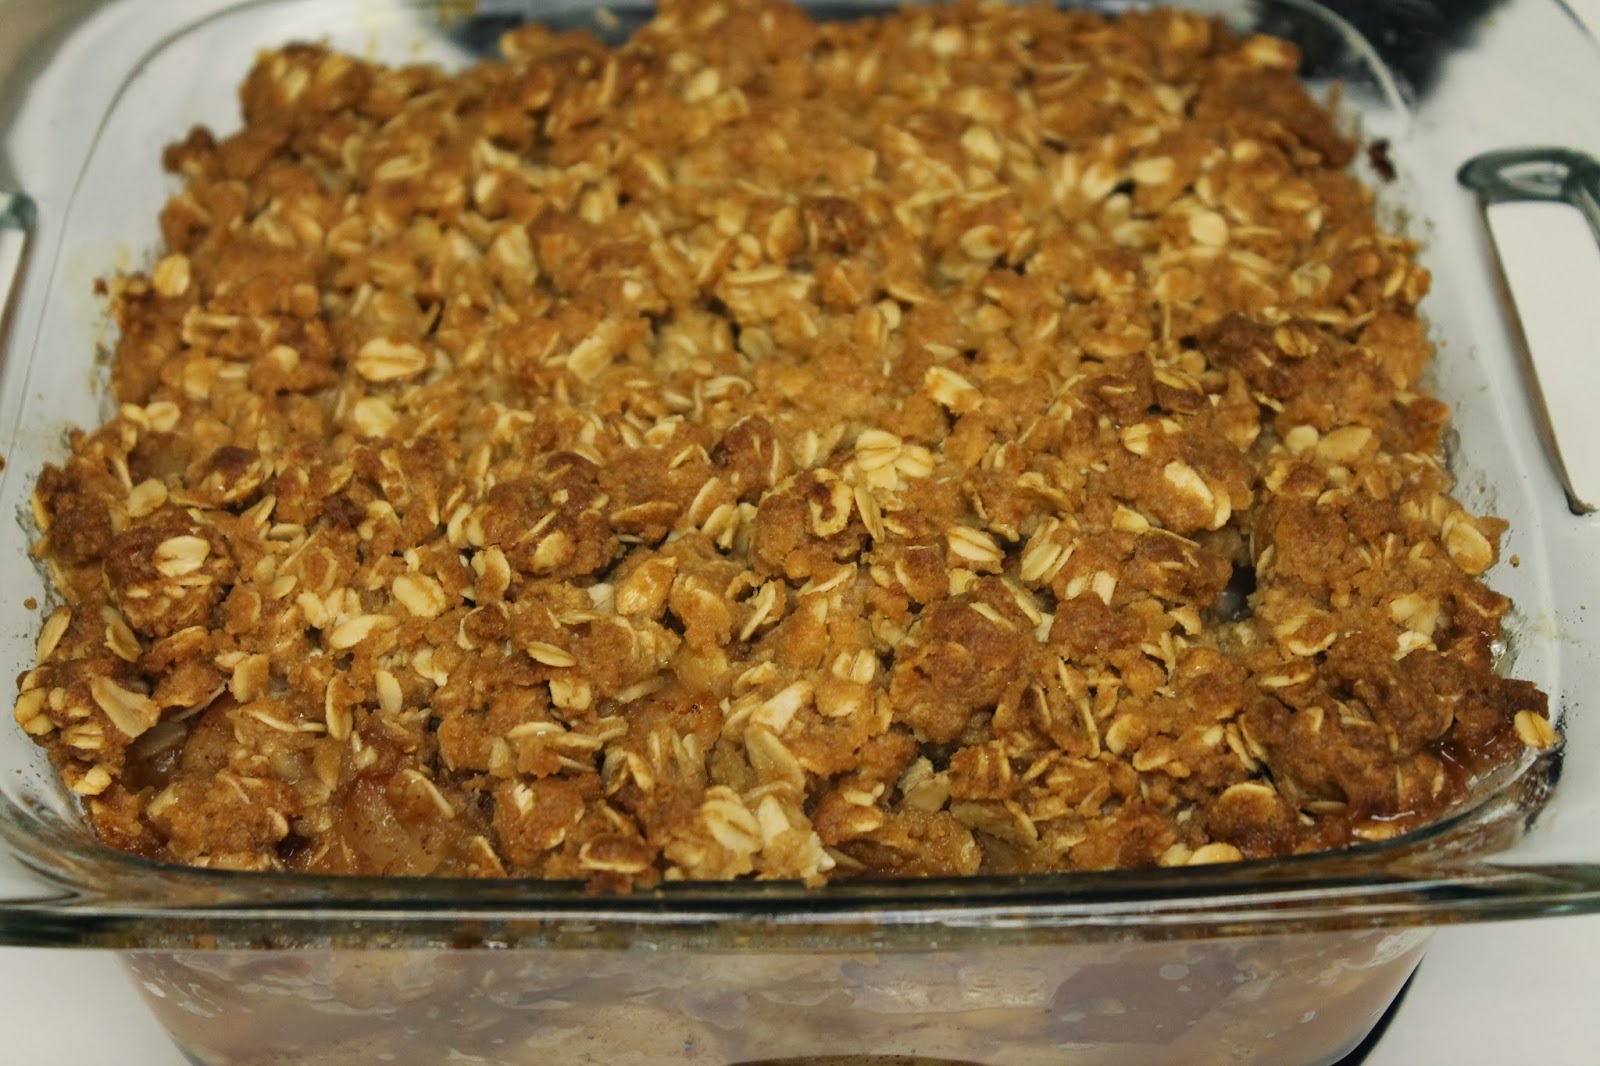
Pear and Apple Oatmeal Crisp

Straight out of the oven.
I had some fruit to use up, so I decided to try my hand at making a crisp. I adapted it from this recipe.

For the filling:
My eclectic bunch of fruit: three Gala apples, two Bartlett Pears, and one Bosc pear.

3 medium apples
3 medium pears
The zest of one lemon
1 tbsp lemon juice
1/3 c. granulated sugar
1 tsp ground cinnamon
1/4 tsp ground nutmeg
1 tbsp brandy

For the topping:

3/4 c. all purpose flour
3/4 c. old-fashioned rolled oats
1/2 c. brown sugar
1/2 c. butter, melted

1. Heat oven to 350'F. Butter a 9" square baking dish.

2. Core the fruit and cut into 3/4" pieces. Combine in a large bowl, then add the zest, lemon juice, sugar, spices, and brandy. Stir until thoroughly coated, and pour into the baking dish.

3. Combine flour, oats, and sugar. If you're going to use unsalted butter, add a generous pinch of salt. Slowly pour in the melted butter, then stir until all the flour is moistened and mixture is crumbly. Sprinkle over the filling.
Mixing the topping.
4. Bake the crisp for 1 hour to 1 1/2 hours, until juices have thickened and fruit has become tender. If topping begins to get too brown, cover with aluminum foil and continue baking until done.

Crisp!
Note: I ended up with a lot of juice. This could be because a) I had to use a smaller pan, and therefore the filling wasn't as spread out as it should have been; b) I could only bake the crisp for about an hour; or possibly c) pears might have more juice in them. Now, I don't mind the juice in the least, and when I heat my crisp up and stir it, the juice blends right in, but it isn't the most attractive look if you want to serve it at a luncheon or something. If you want to ensure you avoid it, do what my mother does when she bakes apple crisp: mix a bit of flour in with the sugar when making the filling, and it will absorb the excess juices.

Original recipe credit goes to Joanne Gallagher at www.inspiredtaste.net.


Sunday 9 February 2014

TeaSparrow

I hope I'm not breaking copyright law here.
So, I just ordered my first TeaSparrow package. What is it, exactly? It's a monthly subscription: every month they send four samples of tea (enough for 35-40 cups of tea, according to the website). The tea samples are carefully curated by their expert team of tea-fanciers and delivered right to my house, er, minuscule apartment. Apparently they always include a mix of both caffeinated and non-caffeinated blends to try, which is awesome as I can try one kind in the morning and another before bed, which is when I always have my tea.

They don't sell the teas from their website - they are entirely unaffiliated with the products they send out - but if you're interested in buying more of something they can direct you to the source from their website.

The site says that the orders will be sent out on the 17th. If everything goes according to plan, I will have a review of the service and the teas up by the end of February.

If you want to check them out, their website is: http://www.teasparrow.com/. They also have a blog on tumblr where they post recipes and such: http://tea-sparrow.tumblr.com/.


Saturday 8 February 2014

Recipe: Garlic Roasted Butternut Squash

Roasted squash with prawns and honey whole-grain bread.
I'd never cooked squash from scratch before. I'd once bought some pre-peeled and cubed butternut squash to make soup with, and that was it for experience with it. However, the other day I bought one on a whim, determined to change that.

It was surprisingly easy. Even with the peeling and cutting, the prep took maybe five minutes - and the result was delicious. Anyway, here is the recipe, taken from Allrecipes.com:

Ingredients:

1 butternut squash, peeled, seeded, and cut into 1-inch cubes
2 tbsp olive oil
2 cloves garlic, minced
salt and ground black pepper to taste
Minced garlic and peeled, cut squash, ready to go.

1. Preheat oven to 400 degrees F (200 degrees C).

2. Toss butternut squash with olive oil and garlic in a large bowl. Season with salt and black pepper. Arrange coated squash on a baking sheet. (I used coarse sea salt.)
Okay, I didn't follow the rules exactly - I put the squash in a lightly greased baking dish instead. Still turned out awesome!
3. Roast in the preheated oven until squash is tender and lightly browned, 25 to 30 minutes.

Fresh from the oven!
It was very tasty for a simple dish. And really, with so few ingredients, it makes for a very flexible side that could be served with almost any main. It's definitely worth a try!

The recipe can be found here: http://allrecipes.com/recipe/simple-roasted-butternut-squash/. Credit goes to Allrecipes user MChele.

Project #1: Kitchen Composter plus Bonus Picture

The Kitchen Composter. Eco-friendly? Probably. Laurence-friendly? We'll see.

So the other day, I saw this at work. It was the only one there, and since I was feeling paranoid about my plants not getting enough nutrients and such, I bought it. It's stainless steel and has a filter in the lid to prevent any smells. And, it is pretty adorable for something that is essentially a little garbage digester.

Of course, after the fact, I do a bit of research, and it seems that I won't be able to actually make compost in such a tiny bin? I'm thinking that I may have to get another, larger one to keep on the patio, which is annoying, as I must ensure it is a) smell-proof, so as not to upset the neighbors or the strata; b) rat-proof, because we live right by the dumpsters and rats like to frolic about in our shrubbery; and c) inexpensive and reasonably attractive.

I really like the idea of a worm composting bin. Worms are cool and not smelly, and worm castings are supposed to be excellent compost. I wonder if I could get a few worms and just put them right in the bin? I do keep the bin indoors, after all. I'm seriously considering joining a gardening community online just so I can bother them with my asinine inquiries.

Anyway, in the meantime, I've been trying to be careful about what I put in my compost.

Pretty, pretty garbage.
That means nothing with seeds (such as tomato seeds) that might decide to randomly grow, no dairy, no meat or fat, etc. I do put my used teabags in, after removing the labels and staples. It seems to be handling it all well so far.

Meanwhile, today is Day 9 of Project #1. Here is what our garlic looks like now:

So proud of that stupid little sprout!
That's a terrible picture, but you get the idea. I'm not sure why the soil is cracking, since I keep it pretty moist. Well, whatever, as long as my sprout is happy.

Unfortunately, that is the only thing that has sprouted so far. I know I should be patient, but I'm starting to get worried. Seven of my seeds could have germinated by now, but haven't. I don't want to have to start over, but I guess I will if I have to. I refuse to give up, damn it!

And now, for the bonus picture, the thing everyone wants to see: my cat.

She is proud of the garlic sprout too. We look at it together. Seriously.


Tuesday 4 February 2014

Review: Nicola Valley Honey


I'd been lusting after this honey from the moment I first saw the gorgeous, hand-crafted pots at Hoffstead's about five months ago. Today I finally gave in and bought it (mainly because I had my partner with me to give permission to spend $20 on a little pot of honey).

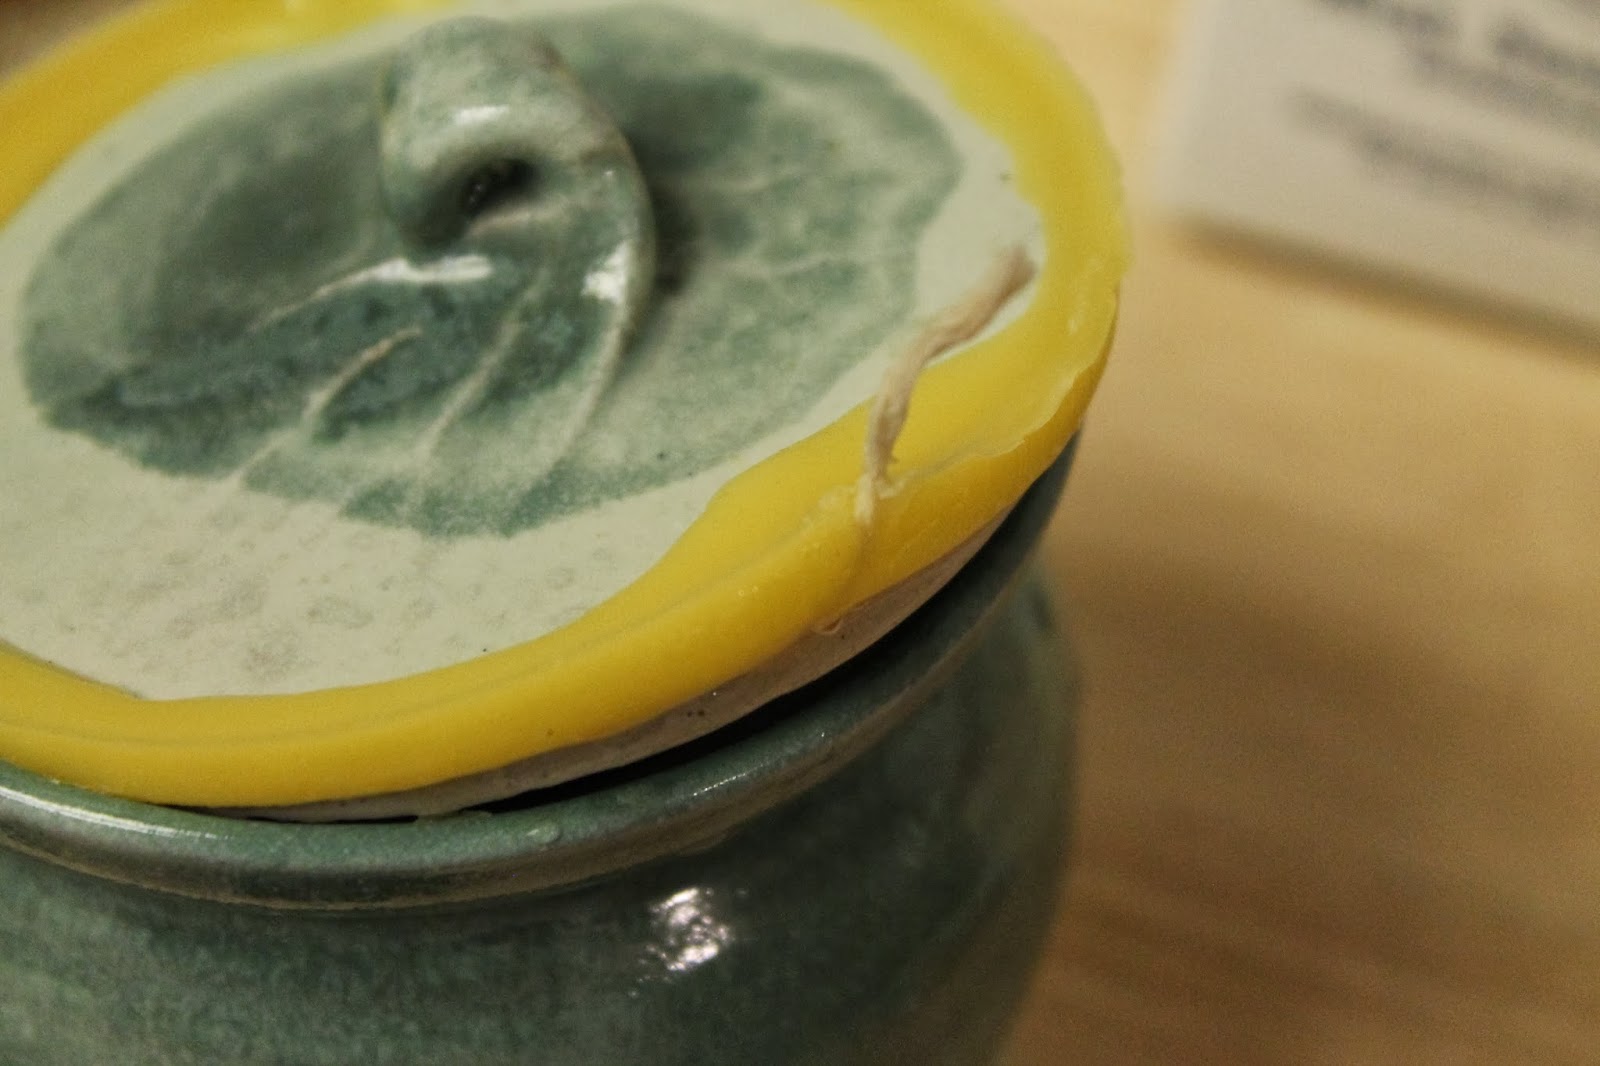
How did I even resist this long? Just look at this beauty:


According to the tag, the honey pot is "individually hand-crafted on the potter's wheel by master potter Bruce Nyeste at Sorrent, B.C. It has been fired to 1300'C and is non-toxic, oven-proof and dishwasher safe." There were other colours, too - blues and browns mostly, but this one was my favourite.

In addition, this is a local product. The pottery is from Sorrent, and the honey is from an apiary in Merritt, British Columbia, a few hours from where I live in the Fraser Valley. Local, hand-crafted, and gourmet - what's not to love?

To open, the tag instructed me to hold the pot under warm water to soften the wax, then pull the string.

Freshly opened.
I did this, and the entire lid came right up. For some reason I was expecting the string to sort of cut through the wax and open it that way. I don't know if I did it right, but this seems more convenient for re-sealing it anyway, so in the end I prefer it. The lid is completely flat across, and while it fits snugly with the beeswax, I wonder how tight it would be without it. I'm thinking I'll have to keep the wax if I want to store anything edible later.


Yum.
As you can see, the honey had crystallized a bit. The tag advised liquefying it by placing the pot in warm water, but I much prefer creamed honey over liquid, so I just stirred it all in, and if it crystallizes any more, awesome.

After stirring. Hungry yet?

Now, for the real test: the taste.

I happened to still have some of my no-name brand creamed honey to compare it to. The Nicola Valley was tangibly more delicious: a little more sharply sweet, hitting high and hot at the roof of my mouth in that marvelous way that pure honey does. There was the faintest muskiness, as in the scent of roses. It was a bit more complex and flavourful than the ordinary stuff, but still very mild. After the initial tasting, I had it in lemon-ginger tea. It performed as it should, and though the delicate musk disappeared (making it good for cooking, I imagine), I fancied that it still tasted somehow the tiniest bit better than normal.

Was it amazing? No, but it was good. I wouldn't spend $20 on just the honey, but with the hand-crafted pot, I think it's worth the price. It would make an excellent gift for many occasions (especially for oneself), and it looks great on the kitchen table. Would I buy it again? Maybe, but mostly for the pot, or as a gift. For honey, there are too many other varieties to try first.

10/10 for presentation, and 7/10 for taste: 8.5 out of 10.

Note: Nicola Valley Honey does have a website, but it's honestly terrible. If you feel like frustrating yourself, you can find it at:  http://nicolavalleyhoney.com

The gorgeous honey pots are made by Mud Sweat and Tears, and their website, which is perfectly fine, can be found at: http://www.mudsweatandtears.ca.

Project #1: Seedlings: First Sprout!

I went to do the evening watering today (Day 5 of Project #1) when I noticed, in the garlic pot, my very first sprout! Granted, the garlic was already sprouting the tiniest bit when I planted it, but this is remarkable all the same. It's growing... alive... thanks to me! I feel like a very proud dad/mad scientist.

The garlic at planting time.
The first sprout!
ISN'T IT BEAUTIFUL? Almost a shame I plan to eat it later.

Project #1: Seedlings: Day 5

Accused of attempted murder.
So this morning I get up to make the caffeine I require in order to survive, and I discover that Gala Apple V had been knocked over in the night. And it was clear who the antagonist was.

Caught returning to the scene of the crime.
I'm pretty sure that it was accidental, as my cat is actually normally very good around plants. Although I've caught her a few times before rubbing her face against the seedlings, making them tip precariously, this is the first time one actually fell over. As you can see, I have yet to buy a tray for my impromptu apple pots, so maybe once I get one they'll have more stability.

I fixed Gala Apple V back up - fortunately, only a bit of the top soil was disturbed, the seed stayed nicely put away - and will buy them all a tray today.

Besides that, I will have yet another look for Bee Balm. I don't want to buy it online because then I will be tempted to buy other things as well (you know, to 'make it worth the shipping', that age-old justification of online shopping addicts everywhere). I don't even get paid until this Friday and I already have plans for all of my spare cash.

Nothing has sprouted above the soil yet, and I'm very disappointed. It's hard not to try and take another look at how the garlic is doing, but I've resisted so far. Tomorrow, I'm not so sure. Savory is supposed to be 5-21 days to germinate, so there's a tiny possibility that I'll see it soon.

Turns out that gardening from seed isn't ideal for the impatient. Maybe this will be good for me. Maybe I'll become veritably Zen-like in my patience and lofty moral character. Or, maybe I'll end up digging furtively through soil every night to see if my garlic has grown another millimeter yet.

Monday 3 February 2014

My Favourite Sauce, or, Why I Need A Kitchen Garden


Tonight, I made my favourite sauce. It's the ultimate in uncomplicated decadence: Alfredo. A classic and nearly impossible to get wrong, it nevertheless took me a few years to find the recipe that I prefer. It is the antithesis of low-calorie, and that's exactly how I like it. None of those healthier versions ever really did it for me.

Here's the recipe:

Alfredo Sauce

- 1/4 c. butter
- 1 1/2 c. freshly grated Parmesan
- 1 c. heavy cream
- 1 clove garlic, crushed
- 1/4 c. chopped fresh parsley
- 1/4 tsp. pepper

1. Melt butter in medium saucepan over medium low heat.
Melting the butter.
2. Add cream and simmer for 5 minutes, then add garlic and cheese and whisk quickly, until cheese is melted.
Whisking in the cream. I usually use 18% - so, basically, table/coffee cream.
Adding the garlic and Parmesan.
3. Stir in parsley and pepper and serve.

I like to use freshly-ground pepper from the Simple Organics Peppercorn Blend mill.

Chopping the garlic.

Notes: I always use three cloves of garlic instead of just the one. My partner adores garlic and so do I, but even with the three cloves the garlic isn't overwhelming. Additionally, I use a whisk for every step, and I find it ensures a much velvetier sauce than using a spoon at all. I always try and whisk the sauce for a minute or so off the heat after it's done, too, so that it can thicken nicely before I pour it over pasta.


This is the final product. Notice anything missing?

Hint: There's nothing green.
That's right, no damn parsley. Why? Because I didn't have any. This happens to me with ridiculous frequency - I go to make something quick for dinner, and I realise that either a) I haven't got the herbs at all or b) it's been a week since I used them, so they're too wilted to be much good.

Which is why I'm finally making myself a kitchen garden. I have suffered needlessly for far too long.